Potting a ball is only half of snooker. The other half is deciding where the cue ball should finish so that the next pot is easy. Beginners tend to hit and hope; experienced players predict the path of the cue ball before they ever play the shot. The key to that prediction is surprisingly simple: the tangent line. This guide explains how the cue ball behaves after contact, how to read the natural angle, what follow and screw do to it, and how to practise position until it becomes second nature.
The tangent line
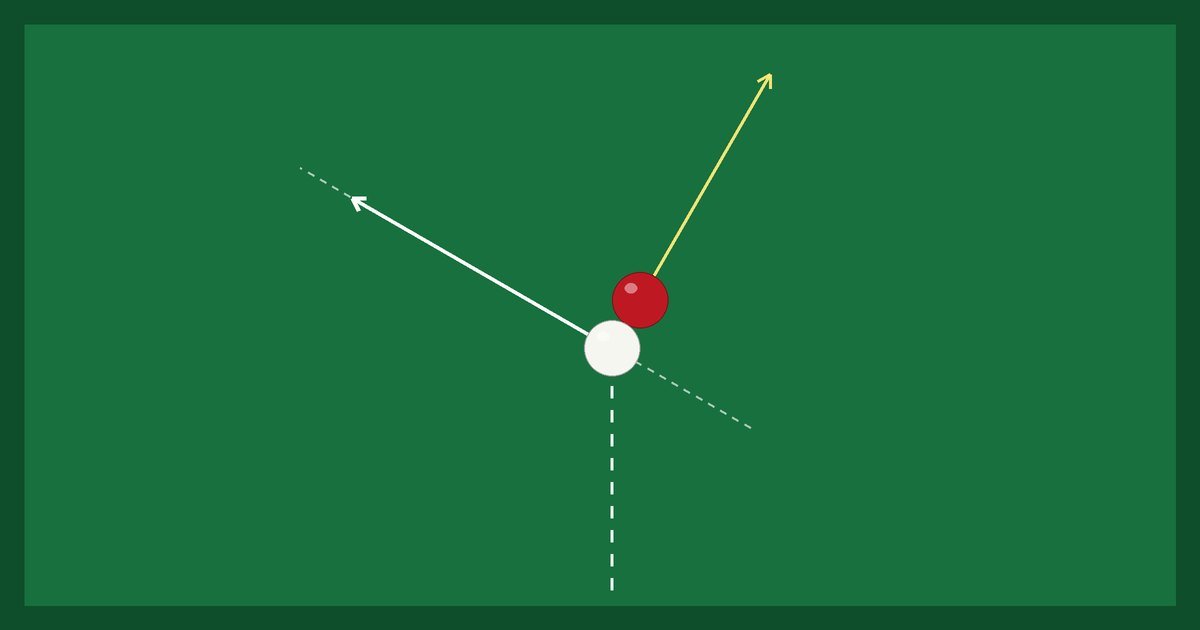
Imagine you hit an object ball with a “stun” shot: a centre-ball strike at medium pace, with no top or bottom spin at the moment the balls meet. After impact the object ball leaves along the line of centres, towards the pocket. The cue ball, meanwhile, leaves at 90 degrees to the object ball’s path. That line, at right angles to the object ball’s direction and passing through the point of contact, is called the tangent line.
This is a useful rule because it works for every cut angle. The only exception is a dead-straight pot, where there is no tangent to follow and a stun shot simply stops the cue ball on the spot. As soon as you cut the ball even slightly, the cue ball moves away along the tangent line.
How the cut angle changes the tangent
The cue ball’s direction after a stun shot depends on how much of the object ball you hit. If the object ball goes off at an angle of θ from the cue ball’s original line, the cue ball goes the other way at 90° − θ. Combine that with the fractions from our potting angles guide and you get a handy table.
| Contact | Object ball turns by | Cue ball (stun) turns by |
|---|---|---|
| Three-quarter ball | 14.5° | 75.5° (almost sideways) |
| Half ball | 30° | 60° |
| Quarter ball | 48.6° | 41.4° |
| One-eighth ball | 61° | 29° (only a small deflection) |
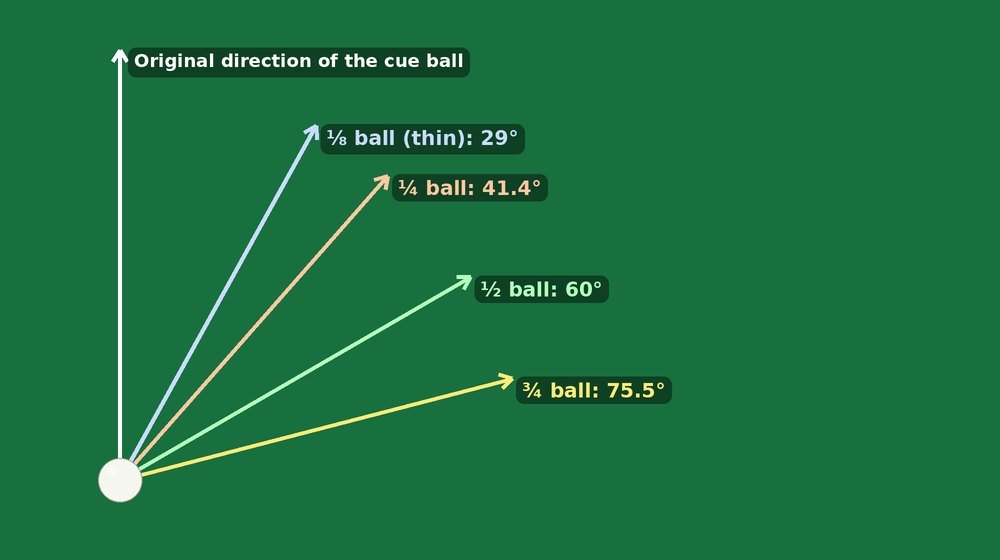
The pattern is easy to remember. A fuller contact sends the cue ball sideways, almost across the table. A thinner contact lets it carry on forwards, only slightly deflected. This is why thin cuts leave the white travelling on up the table, while fuller hits send it wide of the original line.
The natural angle
Few shots are played with pure stun. Most players strike a little above centre or hit the shot with some pace, so the cue ball is already rolling forward at impact. The result is that the cue ball leaves slightly forward of the tangent line. This is often called the natural angle: where the cue ball tends to go when you hit the ball with a normal, medium-pace, centre-ball stroke.
Because the natural angle depends on your pace and where you strike the cue ball, learn yours. Take a reliable reference shot, such as a half-ball pot at medium pace, and watch where the white goes. Then play the same shot a little softer and a little firmer. You will find that a softer shot stays closer to the tangent line, while a firmer shot pushes the white further forward. Knowing this lets you choose the pace that puts the white in the right area.
Using follow and screw to change the path
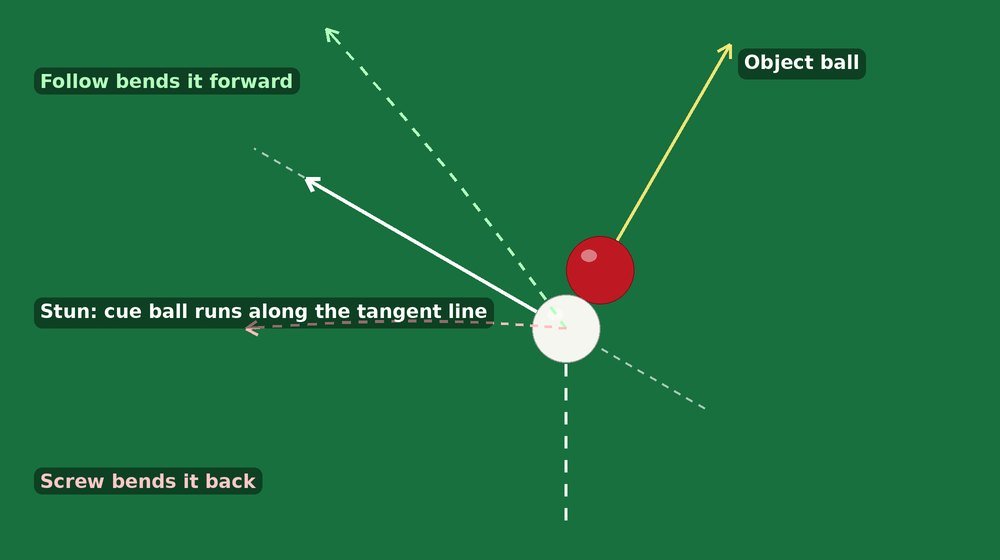
Once you know where stun would send the cue ball, you can move it from there:
- Follow (top spin) makes the cue ball bend forward off the tangent line, so it travels further up the table and tends to finish closer to the pocket the object ball went into.
- Screw (bottom spin) pulls the cue ball back, and on a cut it curves back towards the side the cue ball came from, which is useful for coming off the black or travelling back towards the baulk end.
The more spin you apply, and the more pace you give the shot, the greater the change. On a thin cut the effect is smaller, because the cue ball only just brushes the object ball. Our spin guide covers how to apply each type of spin cleanly; here the point is to use the tangent line as your baseline and judge the effect from there.
Using the cushions
The cue ball does not have to stop in open table. It can travel off one or more cushions to reach its target. As a rough rule, a ball with no side spin rebounds from a cushion at nearly the same angle at which it arrived, but the exact path changes with pace and spin. Slower shots lose speed and shorten, firmer shots rebound more sharply and can leave the cushion at a slightly wider angle. Running side spin (spin that carries the ball further along the cushion) widens the exit angle, while reverse side spin tightens it. A few practice shots on a real table or on our online game will teach you your own cushion angles far better than any rule.
Think in zones, not exact points
You will rarely control the cue ball to the nearest centimetre, so do not plan for an exact spot. Plan for a zone about the size of your hand where the next shot is easy. Good zones usually share a few features:
- The next ball can be potted with a gentle angle, ideally a half ball or fuller, rather than a thin cut.
- The cue ball is not tight against a cushion or a nearby ball, which would limit your cue action.
- You keep options open for the shot after that, for instance, a route to the black or to the next red.
- The zone is on the correct side of the next object ball. Being on the wrong side may leave the pot awkward and the white hard to bring back.
These ideas underpin break-building, where the whole skill is chaining easy pots together by keeping the white in the right zone each time.
A simple planning routine
- Decide the next ball and where you would like to be to pot it comfortably.
- Find the tangent for your current shot. Where does stun send the white?
- Adjust for pace and spin. Do you need follow to travel further, or screw to come back?
- Check the cushions and other balls in the cue ball’s path for obstructions or kisses.
- Play the shot with confidence and, whatever happens, watch where the white actually ends up so that you learn from it.
Drills to learn position
Tangent drill. Place a red near a corner pocket and the cue ball for a half-ball pot. Play a stun shot and mark, with a spare ball, where the cue ball finishes. Repeat with a three-quarter and a quarter ball. You are building a mental map of how contact affects direction.
Red to black drill. Put a red a foot from a top corner pocket and the black on its spot. Pot the red and try to leave the cue ball in a position from which you can pot the black. Count your successes out of ten, then change the angle of the red.
Zone drill. Draw an imaginary box, about the size of your hand, near the next ball. Play ten shots and count how many finish inside it. Reduce the box as your control improves.
More ideas are in our practice drills guide. Keep a note of your scores, and remember that position improves gradually: when your pots become more consistent, your cue-ball control is the next thing to develop.