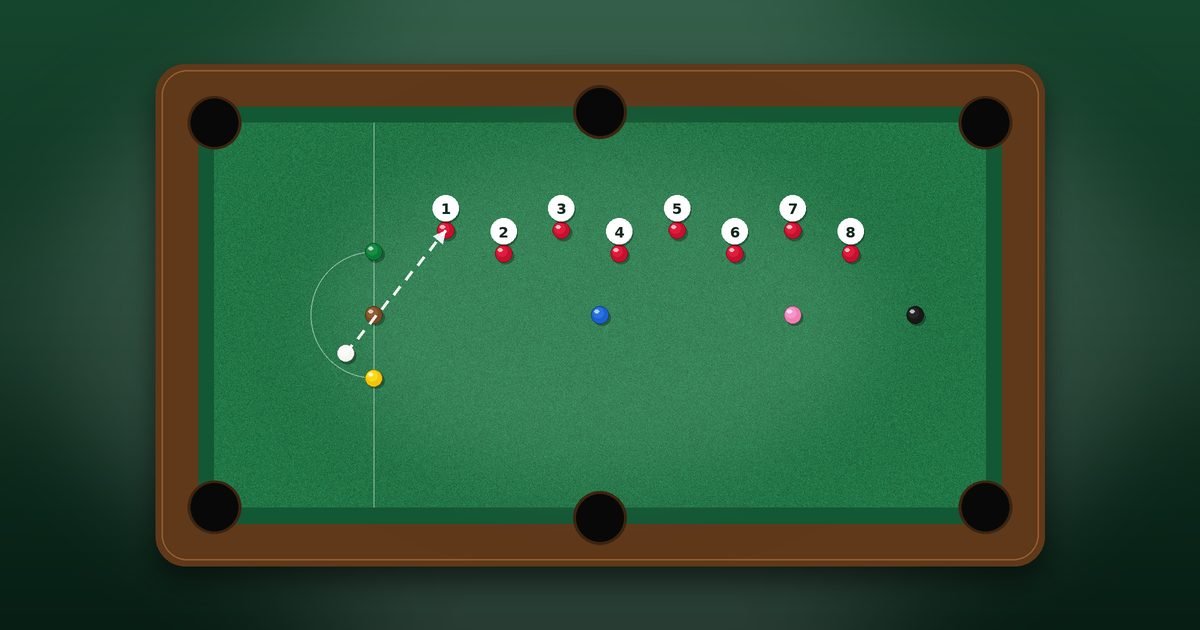
Playing frames is fun, but it is not the fastest way to improve. Deliberate practice, repeating a specific skill with a clear target, is what builds a reliable cue action, a sharp eye and good cue-ball control. This guide gives you a structured set of snooker practice drills, from simple straight-line potting to break-building and safety exercises, along with advice on how to plan a session, keep score and track your progress.
Principles of good practice
A few ideas make practice far more effective.
- Practise with purpose. Decide what you want to improve before you start. A session without a goal tends to become casual knocking about.
- Keep score. Write down your results. Numbers show progress and make drills more engaging.
- Focus on quality. Stop when your concentration drops. Fifty good shots are better than two hundred sloppy ones.
- Mix repetition and variety. Repeat a drill until you improve, then change the setup to stop it becoming automatic.
- Use your match routine. Take your normal stance, bridge and pre-shot routine for each practice shot. Practice should feel like the game.
It also helps to start from solid technique. If you have not yet checked your stance and bridge, read the bridge guide first, then return to these drills.
Warm-up routine
Begin every session with a few minutes of gentle shots. Place the cue ball in the D and hit it up and down the table, aiming for the middle of the top cushion, and watch the return. Do this ten times, concentrating on a smooth, straight cue. Then play a few easy pots, simple straight shots from a short distance. The aim is to loosen your arm, settle your stance and see the ball roll true. If the warm-up shots are not straight, adjust your technique before moving on.
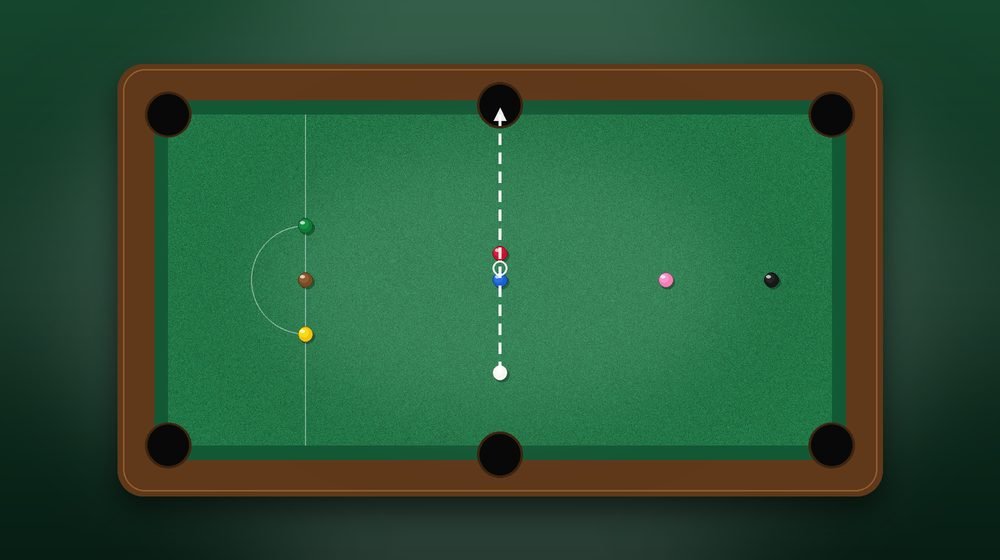
Drill 1: straight potting
Put a red on the spot near the top of the table, and place the cue ball in a straight line behind it, about a foot away. Pot the red into the nearest corner or middle pocket. Reset and repeat. When you can pot ten in a row, increase the distance to two feet, then three, then the length of the table.
The drill teaches you to hit the ball in a straight line with a smooth stroke. Note how the cue ball behaves after each shot. Does it stop, follow through or screw back? Try to control it. Our spin guide explains the techniques. A good target for beginners is eight out of ten from two feet; for a more advanced player, ten out of ten from the length of the table is a fair test.
Drill 2: cut angles
Set a red near a pocket and place the cue ball at different angles, starting with a slight cut and moving to a thinner one. Try to pot the red each time. For each angle, take five shots and count the pots. Begin with an easy angle, then increase the difficulty only when you can pot at least four out of five.
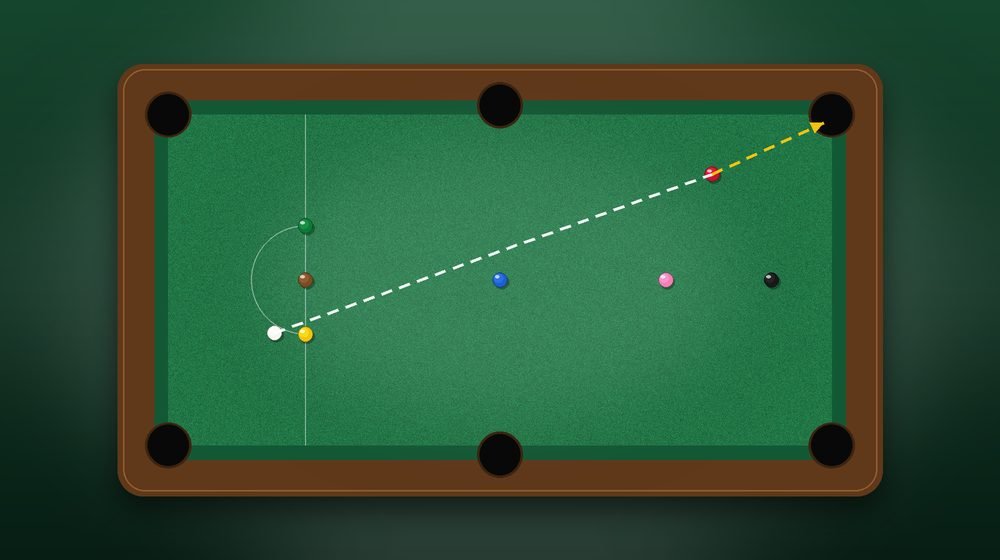
The aim is to learn how to judge the contact point. For each shot, picture the “ghost ball”: an imaginary ball touching the red at the point from which the cue ball must travel to send the red towards the pocket. Aim the centre of the cue ball at the centre of the ghost ball. Our aim tips explain this method.
A useful extension is to repeat the drill with different pockets and with the red at different distances from the pocket. Doing so shows you how the same cut feels with a longer or shorter run to the pocket.
Drill 3: long potting
Long potting is a skill that separates stronger players from weaker ones. Place a red on the pink spot, and place the cue ball in the D. Try to pot the red into a top corner pocket, then into the other. After each attempt, replace the ball and try again.
Keep a score out of ten for each pocket. Pay attention to your stroke: long shots punish any wobble, so keep your head still and use a smooth, medium pace. If you miss, note where: if it is always to the same side, adjust your aim. Many players find that they miss long shots because they hit them too hard. Slow down.
Drill 4: positional play
Place a red close to a corner pocket and a colour, such as the black, on its spot. Put the cue ball a foot or so from the red. Pot the red and try to leave the cue ball in a position from which you can pot the black. Replace both balls, change the cue-ball position and repeat.
The drill is a mini-version of break-building. To score, count a point for each red you pot and a further point each time the cue ball finishes within a six-inch area of your target position. A score of 15 from 20 shots is a strong beginner result. For the thinking behind this exercise, see the break-building guide.
You can make the drill harder by placing the target position on the other side of the table, or by choosing a colour that needs a bigger movement of the cue ball. As you improve, change the angle of the red as well.
Drill 5: the line-up
The line-up is a classic practice routine. Place the six colours on their spots, and spread the fifteen reds in a line or a loose pattern. Try to clear the table, potting a red followed by a colour of your choice, and replacing the colours as you go. Once the reds are gone, pot the colours in order.
If the table is too crowded, start with fewer reds, say six. Count your total score and try to beat it in the next attempt. Because the pack is open, you can choose your own route, which teaches you to plan two or three shots ahead. If you miss, replace the balls and start again, or carry on and record your score. For a more demanding version, set a limit on the number of reds you may miss.
The line-up is excellent for building a sense of rhythm. Over time, you will find that your breaks grow longer and your cue-ball control improves almost without thinking about it.
Drill 6: safety and escapes
Practise defence as seriously as attack. For a basic safety drill, place a red in the pack and the cue ball in the D. Play a long safety, hitting the red lightly and returning to baulk. Count how many times you leave the cue ball within the baulk area, and how many times you hit the cushion at the top. Aim for six out of ten, then raise the standard.
For an escape drill, place a colour in front of the cue ball so that you are snookered behind it, and set a red at the opposite end. Practise kicking off one cushion to hit the red. Mark the cushion with a small piece of chalk each time you succeed, so you learn where to aim. Further guidance appears in our guides to safety play and snookers and escapes.
A more advanced variant is the “safety battle”: play a mini-frame against a friend in which you may only play safe shots. The first player to leave a pot loses a point. It makes you think about your opponent’s options as well as your own.
Planning a session
A balanced hour of practice might look like this:
- Warm-up (10 minutes): gentle shots and easy pots.
- Technical drill (15 minutes): straight potting or cut angles, depending on your weakest area.
- Positional drill (15 minutes): the position drill or a short line-up.
- Safety drill (10 minutes): long safety or an escape drill.
- Game play (10 minutes): a short frame or a line-up to apply what you have practised.
Change the focus from day to day, so that you cover every skill over a week. If you only have thirty minutes, choose the drill that best matches your needs. If you practise on our free online table, try the same drills in practice mode and compare your scores with the real table.
Tracking your progress
Keep a notebook or a spreadsheet with the date, the drill and your score. Over a few weeks, patterns will show: you may find that you are strong on straight shots but weak on long pots, or that you lose your focus after forty minutes. Use these findings to adjust your plan. Do not be discouraged by a bad day, which is normal and does not undo your progress. Over months, the trend will be upward.
Finally, remember to enjoy the practice. Snooker is a game of patience, and the satisfaction of watching your skills improve is one of its greatest rewards. If you also want to improve your composure, read our guide to the mental game.