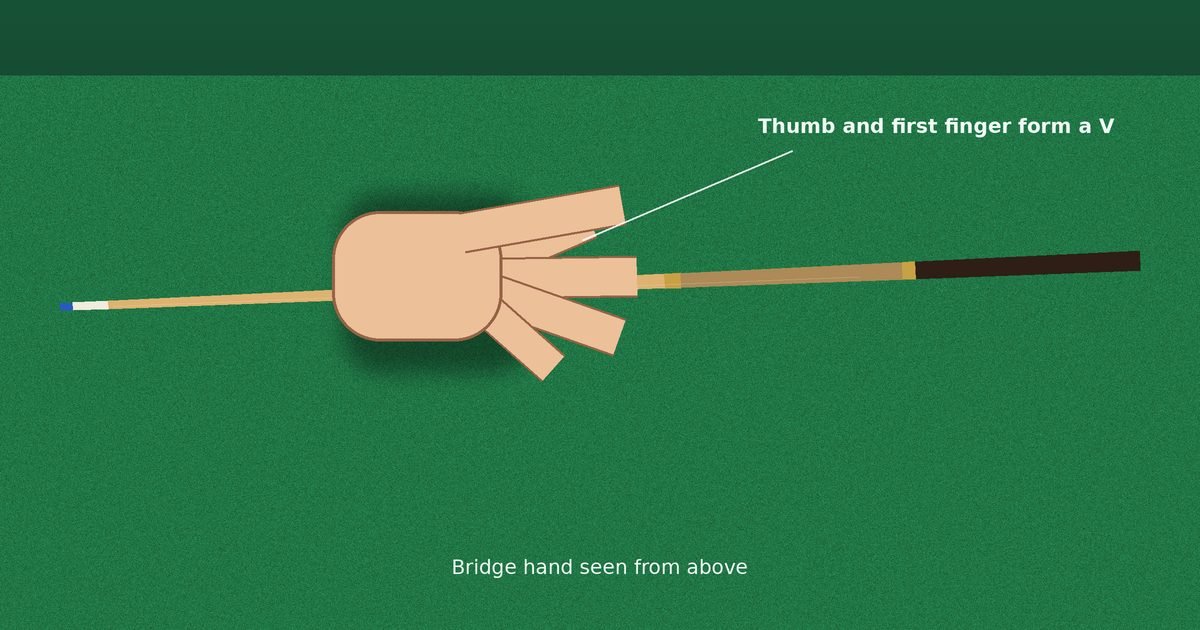
Your bridge hand is the cradle that guides the front of the cue, and it may be the most underrated part of a snooker player’s technique. A stable bridge keeps the cue on line, a poor one turns every shot into a gamble. Alongside the hand bridge, the rest and its variations let you play shots that are out of reach. This guide explains how to build a reliable bridge, the main hand shapes, how to use the rest, the spider and the swan, and how to fix common problems.
Why the bridge matters
When you hit a ball, you want the cue to travel along a single straight line, parallel to the table. The back hand supplies the power, but the bridge supports the cue and keeps it level and straight. If the bridge is loose, the cue wobbles. If it is too high, the cue slopes. If it moves during the stroke, the shot goes astray.
Think of the bridge as a gun rest. Its job is to give the cue a clear, steady groove. It does not push the cue. It does not grip hard. It simply holds the cue in the right place and lets the arm swing freely.
The closed bridge
The closed bridge, sometimes called the “loop” or the “ring”, is the most secure and is widely used for firm shots. To form it:
- Place your hand flat on the cloth, a comfortable distance in front of the cue ball. Spread your fingers and press the pads and thumb lightly into the baize.
- Bring your thumb and index finger together to form a ring around the shaft, or wrap your forefinger around the cue so that the cue passes through a loop.
- Raise the knuckles slightly to create a small arch, so that the shaft sits just above the cloth.
- Keep the rest of your fingers spread for stability, with the pinky and ring fingers wide.
The closed bridge offers a firm hold, which suits shots where you want to apply a lot of power or spin, such as a strong screw. It is less forgiving if the cue moves sideways inside the loop, so keep the loop snug but not tight.
The open bridge
The open bridge, also called the “V” bridge, is the most common choice for general play. It is simple, flexible and easy to adjust.
- Place your hand flat on the table, fingers spread, and press your fingertips down.
- Lift your thumb up and pull it back slightly towards the hand, forming a V between the thumb and the base of the index finger.
- Rest the cue in the V, so that it slides forward and back smoothly.
The open bridge is easier to learn than the closed one, and many professionals use a version of it for most shots. It gives the cue a little more freedom to move, which helps for slower shots and delicate touches. The disadvantage is that it provides less lateral support, so it is better to keep it low and close to the cue ball.
Try both bridges and decide which one feels more natural. Many players use the closed bridge for hard shots and the open bridge for softer ones. The choice matters less than keeping it consistent from shot to shot.
Bridge length and height
Two measurements matter: how far the bridge hand sits from the cue ball, and how high the cue is above the cloth.
- Distance: A distance of around six to eight inches, about the length of your hand, is a good starting point. A shorter bridge gives better control for soft shots and short pots, while a longer bridge allows a longer stroke and more power, but the cue is harder to keep steady. Beginners often make the bridge too long, which makes the cue wobble. If you are struggling with accuracy, try shortening it.
- Height: The cue should be as level as possible, because any slope adds an unwanted sideways component. In practice, the cue is slightly raised at the front, with the butt a little higher than the tip. The less slope, the better. Keep your hand low and your wrist relaxed.
Your height and your stance affect all this. When you lower your body to the shot, your chin should be close to the cue and your eye directly above or just behind it. If the bridge is too high, you will tend to lift the butt, which causes the cue to rise and may lead to a miscue. Our tips on aim and cue-ball control offer more on stance.
Bridging near a cushion and over a ball
Many shots require an adjustment because the cue ball is close to a cushion or another ball.
- Cue ball near the cushion. Place your hand on the top of the cushion, or form a bridge by raising your fingers and resting the cue between your fingers and the cushion. Because the cue must be higher, you cannot play with much spin, so keep the shot simple.
- Cue ball against the cushion. You may need to play down onto the cue ball with a steep cue, which reduces your control. Many players choose the rest instead.
- Bridging over a ball. If a ball blocks the usual bridge position, you can raise the hand into a higher bridge: hold the fingers close together, thumb raised, and rest the cue in a taller frame. Take care not to touch the ball, because touching any ball with your hand or cue is a foul.
The rules say that your cue must not disturb any ball while you are bridging or taking your stance. Check the position of all balls around you before you put your hand down, and make sure your clothing and sleeves are clear.
Using the rest
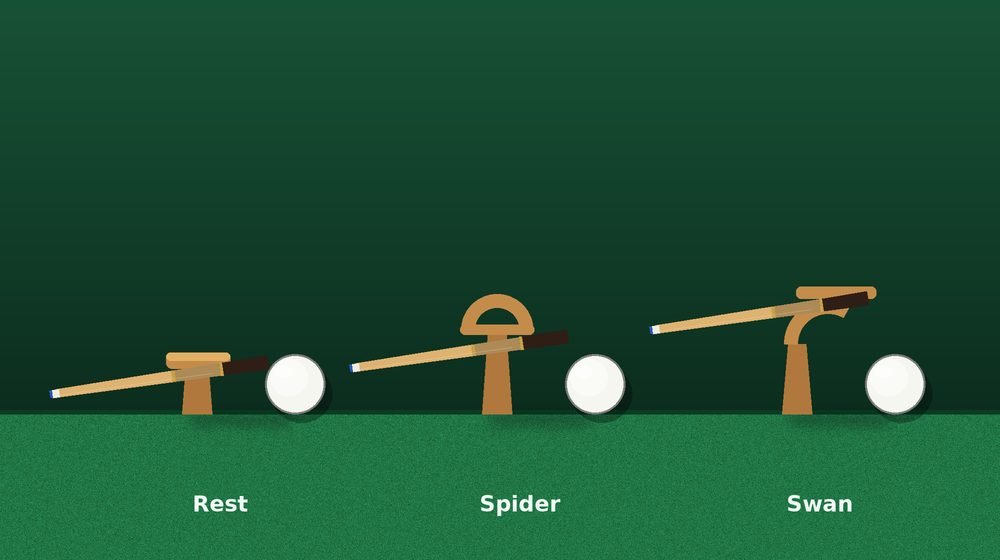
The rest, a long stick with a cross-shaped head, is used when the cue ball is too far away to reach comfortably. It is not a sign of weakness, and every professional uses it. The skill is in setting it up correctly.
- Place the head of the rest firmly on the cloth, close enough to the cue ball to control the shot but far enough to leave room for the tip to strike.
- Hold the rest steady with your left hand (if you are right-handed), with the shaft pressed against your hip or the table edge for extra stability.
- Rest the cue on the notch in the head, keeping the cue as level as possible.
- Take your normal stance, with your eye above the cue and your back arm swinging in line.
- Use a smooth, slow stroke, because the rest makes the shot longer and less direct.
Rest shots feel awkward at first, because the cue sits higher and the distance is greater. Practise by placing the cue ball near the centre of the table and playing a straight pot with the rest. As you build confidence, add angles. Remember that a rest shot is a normal shot: the aim is exactly the same, but the technique is slightly different.
Spider, swan and extended rests
For awkward positions, there are several special rests with different head shapes.
- The spider has a high, arched head that lifts the cue above a ball that stands in the way. It is used when the cue ball is behind a ball and a normal rest would touch it.
- The swan (or swan neck) has an even higher, narrower head that allows play over a larger obstruction, such as a stack of balls near the cushion.
- The extended rest has a longer shaft for shots from far across the table.
- The hook rest, which is less common, allows play from behind a tight cluster of balls.
In a typical frame, you will use the standard rest most often, and the spider occasionally. The swan is rarer, but invaluable in the right place. To avoid fouls, place the rest carefully, and do not touch any ball with it.
Extensions and long cues
Another way of reaching a distant ball is to use an extension that screws onto the butt of the cue and makes it longer. This keeps the cue in your normal hand and avoids the unfamiliar feel of a rest. Many players prefer an extension for shots at the far end of the table. However, an extension changes the balance of the cue, and it may feel heavy at the back, so practise before using it in a match. Our cue buying guide says more about this accessory.
Common problems and fixes
- The cue wobbles. Shorten the bridge, press the fingertips more firmly into the cloth and relax your grip.
- The bridge collapses at the moment of impact. Spread the fingers wider and keep the heel of the hand in contact with the table.
- The cue rises on the stroke. Check that your back arm is moving in a straight line and that your elbow is not lifting.
- Frequent miscues. Make sure your tip is chalked, the cue is level and the bridge is not too high.
- Sore hand. You may be pressing too hard. The bridge should feel firm but relaxed.
A good habit is to check your bridge before every shot, the same way every time. Over time, it becomes second nature. Combine it with a steady stance, and you will find that your accuracy improves quickly. When you are ready to work on the whole routine, try the exercises in our practice drills guide.